2020年7月

在处理关联数组时,经常需要对多维数组按指定字段分组聚合,下面封装了一个数组分组聚合方法:

/**
 * 对数组进行分组聚合
 * @param $array
 * @param $keys
 * @return $result
 */
function array_group_by($array, $keys)
{
    if(!is_array($keys) || count($keys) == 1)
    {
        $key = is_array($keys) ? array_shift($keys) : $keys;

        return array_reduce($array, function($tmp_result, $item) use ($key)
        {
            $tmp_result[$item[$key]][] = $item;

            return $tmp_result;
        });
    }
    else
    {
        $keys = array_values($keys);

        $result = array_group_by($array, array_shift($keys));

        foreach ($result as $k=>$value)
        {
            $result[$k] = array_group_by($value, $keys);
        }

        return $result;
    }
}

测试:

$arr = [
     [
       "first" => "aa",
       "second" => "ccc",
       "third" => "sdfgg",
     ],
     [
       "first" => "aa",
       "second" => "ccc",
       "third" => "dddsa",
     ],
     [
       "first" => "aa",
       "second" => "sdfsdfd",
       "third" => "sdfgg",
     ],
     [
       "first" => "bb",
       "second" => "ccc",
       "third" => "sdfgg",
     ],
     [
       "first" => "bb",
       "second" => "sdfsdfd",
       "third" => "sdfgg",
     ],
   ];
    
    print_r(array_group_by($arr, ['first']));
    /*
    [
     "aa" => [
       [
         "first" => "aa",
         "second" => "ccc",
         "third" => "sdfgg",
       ],
       [
         "first" => "aa",
         "second" => "ccc",
         "third" => "dddsa",
       ],
       [
         "first" => "aa",
         "second" => "sdfsdfd",
         "third" => "sdfgg",
       ],
     ],
     "bb" => [
       [
         "first" => "bb",
         "second" => "ccc",
         "third" => "sdfgg",
       ],
       [
         "first" => "bb",
         "second" => "sdfsdfd",
         "third" => "sdfgg",
       ],
     ],
   ]
    */
    print_r(array_group_by($arr, ['first','second']));
    /*
    [
     "aa" => [
       "ccc" => [
         [
           "first" => "aa",
           "second" => "ccc",
           "third" => "sdfgg",
         ],
         [
           "first" => "aa",
           "second" => "ccc",
           "third" => "dddsa",
         ],
       ],
       "sdfsdfd" => [
         [
           "first" => "aa",
           "second" => "sdfsdfd",
           "third" => "sdfgg",
         ],
       ],
     ],
     "bb" => [
       "ccc" => [
         [
           "first" => "bb",
           "second" => "ccc",
           "third" => "sdfgg",
         ],
       ],
       "sdfsdfd" => [
         [
           "first" => "bb",
           "second" => "sdfsdfd",
           "third" => "sdfgg",
         ],
       ],
     ],
   ]
    */

Mysql的count函数用于统计符合条件的记录数,常用的方式有:

1、count(*)
2、count(1)
3、count(id)
4、count(col)

首先需要明确一点:count函数对于返回的结果集,一行行地判断,不会统计null值。

初学者经常会纠结到底应该使用哪种方式做计数,实际上这四种计数方式是有很大差别的。
count()的原理:

    1. count(*)
      遍历整张表,不需要取出数据来计算,直接按行累计。
    1. count(1)
      遍历整张表,不需要取数,按行计数。
    2. count(id)
      遍历整张表,取出id,按行计数。
    3. count(col)
      遍历整张表,取出col,如果字段定义不为null,取出col之后,按行计数。如果字段定义可以为null,循环对col进行判断是否为null值,再计数。

    这四种计数方式遍历整张表的方式也有不同:

    1. count(*)

      会找任意较小的索引遍历,如果没有二级索引,就会直接遍历主键索引,因为主键索引包含了全表数据,所以在字段比较大的时候,可能会需要频繁去磁盘取数据,导致count(*) 效率低,耗时长,结局方案是给一个小字段加个二级索引,这样count(*) 的时候就会遍历这个二级索引,快速进行计数。
    2. count(1)

          使用索引遍历的选择和 count(*)一致。
    3. count(id)

          使用主键索引遍历
    4. count(col)

          如果col建立了二级索引,则会遍历二级索引,否则主键索引
      

    所以,性能上排序为:count(*) > count(1) > count(id) > count(col)。

    在不考虑是否对null计数得区别的前提下,性能优化的方向,除了使用count(*) 外,就是适当使用小的二级索引。

    mysql的count函数可以计算符合条件的记录条数,比如:

    select count(*) from users;

    执行结果:
    在这里插入图片描述

    上面的sql只是将查询到的记录总数输出,count函数本身还可以配合if函数实现更复杂的计数:

    select count(if(status = 1, 1, null)) from users

    注意,count会将所有非null值计数,所以if里面不符合条件应该返回null。

    如果需要按某个字段计算去重后的数量,则需使用 distinct 关键字:

    select count(distinct last_name) from users

    当需要对1:n的关联查询做统计时,以上简单的count使用方式就不足以实现需求了,比如有以下两个表:

    CREATE TABLE `articles` (
      `id` int(10) unsigned NOT NULL AUTO_INCREMENT,
      `title` varchar(255) NOT NULL COMMENT '标题',
      PRIMARY KEY (`id`)
    );
    
    CREATE TABLE `posts` (
      `id` int(10) unsigned NOT NULL AUTO_INCREMENT,
      `status` tinyint(4) NOT NULL ,
       `article_id` int(10) unsigned NOT NULL
      PRIMARY KEY (`id`)
    ) 

    要在一条sql中查询出所有有帖子(posts)的文章(articles)的数量has_post_cnt、无帖子的文章数量not_post_cnt
    首先必定要做连接来关联文章和帖子:

    select * from articles left join posts on posts.article_id = articles.id 

    一般的思路是连接后再按artiles.id 分组,再在外层对posts.id判断是否等于null:

    select count(if(p_id is not null, 1, null)) has_post_cnt, count(if(p_id is null, 1, null)) not_post_cnt from (
        select articles.id a_id, posts.id p_id from articles left join posts on posts.article_id = artiles.id  group by articles.id
    ) tmp 

    但这样的话子查询效率低,考虑不使用子查询的方式实现,首先就必须去掉分组,不然查询结果只能是按分组聚合的结果,出不了所需的计数,首先看这个sql:

    select count(if(posts.id is not null, 1, null)) has_post_cnt, 
        count(if(posts.id is null, 1, null)) not_post_cnt
        from articles left join posts on posts.article_id = artiles.id

    查询出来的not_post_cnt肯定是对的,因为一条没有帖子的文章和帖子表的连接也就是和null连接,肯定是1:1的,不会有重复记录。
    has_post_cnt由于没有对artiles.id做分组,所以是1:n的,这个数是文章的帖子记录数,考虑同一个文章的帖子记录的article_id字段是唯一的,所以使用distinct来做去重处理:

        select count(distinct if(posts.id is not null, posts.article_id, null)) has_post_cnt, 
        count(if(posts.id is null, 1, null)) not_post_cnt
        from articles left join posts on posts.article_id = artiles.id  group by articles.id

    这里的关键是count(distinct if(p_id is not null, posts.article_id, null)),先做了去重再做了计数,得到的结果即是有帖子记录的文章数。

    学习和使用Elasticsearch有一段时间了,项目中大量使用到了es,但对于我来说都是部分或者局部地去使用,所以得找个时间好好整理并且再完整实践一下es,于是就有了这篇文章。

    首先系统架构是LNMP,很简单的个人博客网站(逐步前行STEP),
    使用laravel框架,实现全文检索的引擎是elasticsearch,使用的分词工具是ik-analyzer然后是安装组件:elasticsearch/elasticsearch,以下列表是本次实践所用到的软件/框架/组件的版本:

    1. PHP 7.1.3
    2. Larvel 5.8
    3. Mysql 5.7
    4. elasticsearch 5.3
    5. elasticsearch/elasticsearch 7.2

    以下默认上述环境已经准备完毕。

    实战主要分为4部分:

    1. 创建索引
    2. 全量数据导入es
    3. 增量数据同步es
    4. 关键词检索

    一、创建索引

    博客的以下属性需要纳入检索:

    字段备注属性
    idIDint(11)
    title标题varchar(255)
    description摘要varchar(255)
    content内容text
    category_id分类IDint(11)
    keyword_ids关键词varchar(255)
    read_cnt阅读量int(11)
    created_at发布时间TIMESTAMP
    updated_at更新时间TIMESTAMP

    其中,title、description、content既需要分词来做全文检索,又需要保留部分原字符串便于直接搜索,所以使用fields将字段映射出不同类型:

    "title": {
        "type": "text",
        "fields": {
            "keyword": {
                "type": "keyword",
                "ignore_above": 256
            }
        }
    },

    而在分词器的选择上,为了既能对文档分词更细,又能对检索更精确,在对文档字段分词和对检索时的输入分词使用不同的分词器:

    "title": {
       "type": "text",
         "fields": {
             "keyword": {
                 "type": "keyword",
                 "ignore_above": 256
             }
         },
         "analyzer": "ik_max_word",
         "search_analyzer": "ik_smart"
     },

    比如,title为”重走丝绸之路“,ik_max_word分词如下:

    {
        "tokens": [
            {
                "token": "重走",
                "start_offset": 0,
                "end_offset": 2,
                "type": "CN_WORD",
                "position": 0
            },
            {
                "token": "丝绸之路",
                "start_offset": 2,
                "end_offset": 6,
                "type": "CN_WORD",
                "position": 1
            },
            {
                "token": "丝绸",
                "start_offset": 2,
                "end_offset": 4,
                "type": "CN_WORD",
                "position": 2
            },
            {
                "token": "之路",
                "start_offset": 4,
                "end_offset": 6,
                "type": "CN_WORD",
                "position": 3
            }
        ]
    }

    而ik_smart分词粒度更粗:

    {
        "tokens": [
            {
                "token": "重走",
                "start_offset": 0,
                "end_offset": 2,
                "type": "CN_WORD",
                "position": 0
            },
            {
                "token": "丝绸之路",
                "start_offset": 2,
                "end_offset": 6,
                "type": "CN_WORD",
                "position": 1
            }
        ]
    }

    键搜索词为”重走丝绸之路“,我们当然希望原文尽可能多匹配到这个检索词,而不是每个字都可能检索出一堆文档,这就是匹配的精确度。

    对于keyword_ids、category_id,导入到es中时,就要装换成具体的内容了,才能要支持用户使用文本检索,而不是限制使用ID,这两个字段分别在es中字段名设置为keywords、category。
    而且,一般来说关键词的检索,只考虑精确匹配,比如说关键词”全文检索“,如果要分词的话就会变成:

    {
        "tokens": [
            {
                "token": "全文",
                "start_offset": 0,
                "end_offset": 2,
                "type": "CN_WORD",
                "position": 0
            },
            {
                "token": "检索",
                "start_offset": 2,
                "end_offset": 4,
                "type": "CN_WORD",
                "position": 1
            }
        ]
    }

    而实际上,全文可能匹配一部分文档,检索页匹配一部分文档,这对于关键词这个属性定义来说,是没有意义的,所以,我们对keywords、category使用”keyword“类型。

    考虑到该实战只是最小实现,忽略别名(aliases),分片配置使用默认,相应的需建立索引articles如下:

    {
            "mappings": {
                "doc": {
                    "properties": {
                        "id": {
                            "type": "long"
                        },
                        "keywords": {
                            "type": "keyword",
                            "ignore_above": 256
                        },
                        "categorys": {
                            "type": "keyword",
                            "ignore_above": 256
                        },
                        "read_cnt": {
                            "type": "long"
                        },
                        "title": {
                            "type": "text",
                            "fields": {
                                "keyword": {
                                    "type": "keyword",
                                    "ignore_above": 256
                                }
                            },
                            "analyzer": "ik_max_word",
                            "search_analyzer": "ik_smart"
                        },
                        "description": {
                            "type": "text",
                            "fields": {
                                "keyword": {
                                    "type": "keyword",
                                    "ignore_above": 256
                                }
                            },
                            "analyzer": "ik_max_word",
                            "search_analyzer": "ik_smart"
                        },
                        "created_at": {
                            "type": "date",
                            "format": "yyyy-MM-dd HH:mm:ss||yyyy-MM-dd||epoch_millis"
                        },
                        "updated_at": {
                            "type": "date",
                            "format": "yyyy-MM-dd HH:mm:ss||yyyy-MM-dd||epoch_millis"
                        }
                    }
                }
            }
        
    }

    使用 PUT /articles API创建索引成功后会返回:

    {
        "acknowledged": true,
        "shards_acknowledged": true
    }

    二、全量数据导入es

    因为是对已有的博客网站打造全文检索,所以首先需要进行一次全量导入ES。第一步的操作都是直接使用es api完成的,而这一步涉及到数据查询与转换,则需要在我们的项目内完成。

    首先我们需要熟悉es组件elasticsearch/elasticsearch的使用,以下介绍本次实战涉及到的一些功能,更多可以直接看文档:Elasticsearch-PHP 中文文档

    我们先在配置文件config/elastic.php定义好es的连接信息:

    <?php
    
    return array(
        'default' => [
             'hosts'     => [
                [
                     'host' => ‘xxx.xxx.xxx.xxx’,
                     'port' => '9200',
                     'scheme' => 'http',
                 ]
             ],
            'retries'   => 1,
    
            /*
            |--------------------------------------------------------------------------
            | Default Index Name
            |--------------------------------------------------------------------------
            |
            | This is the index name that elasticquent will use for all
            */
            'default_index' => ‘default_index’,
        ],
    );


    再使用批量批量索引文档的方法:bulk,示例:

    for($i = 0; $i < 100; $i++) {
        $params['body'][] = [
            'index' => [
                '_index' => 'my_index',
                '_type' => 'my_type',
            ]
        ];
    
        $params['body'][] = [
            'my_field' => 'my_value'
        ];
    }
    
    $responses = ClientBuilder::create()->build()->bulk($params);
    

    这里不能直接使用查库后的数据,需要做一些转换工作,比如keyword_ids 转换成keywords,我们封装一个函数:getDoc()

    
    public function getDoc()
    {
        $fields = [
            'id',
            ’title,
            ‘description’,
            ‘read_cnt’,
            'created_at’,
            ‘updated_at’
        ];
    
        $data = array_only($this->getAttributes(), $fields);
    
        $data[‘keywords’] = ArticleKeyword::whereIn(‘id’, $this->keyword_ids)->pluck(‘name’)->toArray();
    
        $data[‘category’] = ArticleCategory::find($this->category_id);
    
        return $data;
    }
    

    直接调用该方法获取需要同步的文档数据。
    注意使用该方法批量索引时,index + 一组数据是成对的。
    按照第一步新建的索引,直接使用组件提供的批量索引功能全量将查询出的数据同步到es中。

    3、增量数据同步es

    对于新增的数据,需要在写入库中的同时同步到es,这里使用到的方案是Eloquent 的模型事件。

    在 Eloquent 模型类上进行查询、插入、更新、删除操作时,会触发相应的模型事件,不管你有没有监听它们。这些事件包括:

    retrieved 获取到模型实例后触发
    creating 插入到数据库前触发
    created 插入到数据库后触发
    updating 更新到数据库前触发
    updated 更新到数据库后触发
    saving 保存到数据库前触发(插入/更新之前,无论插入还是更新都会触发)
    saved 保存到数据库后触发(插入/更新之后,无论插入还是更新都会触发)
    deleting 从数据库删除记录前触发
    deleted 从数据库删除记录后触发
    restoring 恢复软删除记录前触发
    restored 恢复软删除记录后触发

    而我们需要使用到的事件是:saved、deleted,监听这两个事件,在触发后同步到es,这样文章的增、改、删操作都能实时将数据变化同步到es。

    我们使用fireModelEvent设置事件触发的同步操作,这里用到了组件中的单文档索引功能:index,示例:

    $params = [
        'index' => 'my_index',
        'type' => 'my_type',
        'id' => 'my_id',
        'body' => [ 'testField' => 'abc']
    ];
    
    $response = $client->index($params);

    使用第2步中的getDoc()方法来获取待更新的数据。
    具体实现如下:

        public function fireModelEvent($event, $halt = true)
        {
            if (in_array($event, ['saved', 'deleted']))
            {
                if($event == 'deleted')
                {
                    ClientBuilder::create()->build()->delete(['id' => $this->id]);
                }
    
                if($event == 'saved')
                {
                    $params = [
                        'index' => 'articles',
                        'type' => 'doc',
                        'id' => $this->id,
                        'body' => $this->getDoc()
                    ];
    
                    ClientBuilder::create()->build()->index($params);
                }
            }
        }

    4、检索数据

    通过2、3步骤,我们的文章已经实时同步到es上了,这一步我们需要将es的全文检索开放给用户使用,在我的网站中,我在文章列表增加了一个搜索框给用户输入需检索的文本:
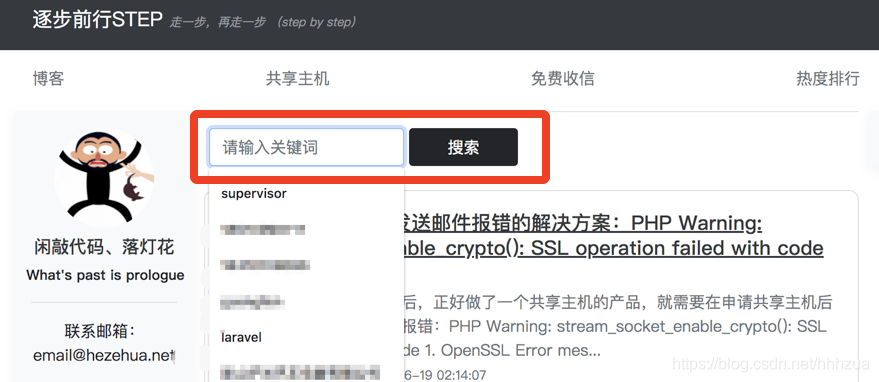
    在这里插入图片描述
    这里有两个需求:
    1、对title、description、keywords、category 做 query_string 查询
    2、将查询结果转化为Eloquent集合,便于结果展示

    封装的检索函数:

        public static function search($keyword, $page = 1, $per_page = 20, $conditions = [], $sort = null)
        {
            $page = max(1, intval($page));
    
            $from = ($page - 1) * $per_page;
    
            $query = [];
            //搜索文本字段
            $search_fields = ['title', 'keywords', 'category', 'description'];
    
            if($keyword)
            {
                foreach ($search_fields as $key => $search_field)
                {
                    $query['must']['bool']['should'][] = [
                        'query_string' => [
                            'default_field' => $search_field,
                            'query' => strtolower($keyword),
                            'default_operator' => 'AND',
                        ]
                    ];
                }
            }
    
            $params = [
                'index' => 'articles',
                'type' => 'doc',
                'body' => [
                    'query' => $query
                ]
            ];
    
            $response = ClientBuilder::create()->build()->search($params);
    
            $total_count = array_get($response, 'hits.total', 0);
    
            $collection = new Collection();
    
            foreach (array_get($response, 'hits.hits', []) as $key => $item)
            {
                $self = new static;
    
                $self->setRawAttributes($item['_source'], true);
    
                $collection->add($self);
            }
    
            return new LengthAwarePaginator($collection, $total_count, $per_page, intval($from/$per_page) + 1);
        }

    Elasticsearch 的相似度算法被定义为检索词频率/反向文档频率, TF/IDF 。

    一. 相关概念:

    1. 检索词频率:tf

    词 t 在文档 d 的词频( tf )是该词在文档中出现次数的平方根。

    tf(t in d) = √frequency

    检索词在该字段出现的频率?出现频率越高,相关性也越高。 字段中出现过 5 次要比只出现过 1 次的相关性高。

    1. 反向文档频率:idf

    词 t 的逆向文档频率( idf )是:索引中文档数量除以所有包含该词的文档数,然后求其对数。

    idf(t) = 1 + log ( numDocs / (docFreq + 1))

    每个检索词在索引中出现的频率?频率越高,相关性越低。检索词出现在多数文档中会比出现在少数文档中的权重更低。

    二、计算公式为:

    score(q,d)  =  queryNorm(q)  · coord(q,d)  · ∑ (tf(t,d) · idf(t)² · t.getBoost() · norm(t,d))  

    其它参数定义:

    1. 字段长度准则:norm

    字段长度归一值( norm )是字段中词数平方根的倒数。

    norm(d) = 1 / √numTerms

    字段的长度是多少?长度越长,相关性越低。 检索词出现在一个短的 title 要比同样的词出现在一个长的 content 字段权重更大。

    1. 查询归一因子

    查询归一因子queryNorm )试图将查询 归一化 ,这样就能将两个不同的查询结果相比较。

    这个因子是在查询过程的最前面计算的,具体的计算依赖于具体查询

    queryNorm = 1 / √sumOfSquaredWeights 

    sumOfSquaredWeights 是查询里每个词的 IDF 的平方和。

    以上是对于一个词项检索时的相关度计算,当查询多个词项时,得出多个相关度,则需要按照向量空间模型来计算整体的相似度:

    向量空间模型:vector

    向量空间模型(vector space model) 提供一种比较多词查询的方式,单个评分代表文档与查询的匹配程度

    在向量空间模型里,向量空间模型里的每个数字都代表一个词的 权重 ,与 词频/逆向文档频率(term frequency/inverse document frequency) 计算方式类似。

    3、控制相关度

    一般来说,控制相关度的需求,分为两种:

    1. 忽略TF/IDF
      即不需要评分,可以使用constant_score来达成,在 constant_score 查询中,它可以包含查询或过滤,为任意一个匹配的文档指定评分 1 ,忽略 TF/IDF 信息。
    2. 定制评分
      function_score 查询 是用来控制评分过程的终极武器,它允许为每个与主查询匹配的文档应用一个函数,以达到改变甚至完全替换原始查询评分 _score 的目的。本文主要介绍使用script_score函数。

    使用脚本计算评
    script_score
    自定义脚本可以完全控制评分计算:

    {
        "function_score": {
            "functions": {
                "script_score": {
                    "script": "doc['price'].value + doc['margin'].value"
                }
            }
        }
    }

    4、Painless

    es脚本引擎,简单安全,无痛使用,Painless使用白名单来限制函数与字段的访问,针对es的场景来进行优化,只做es数据的操作,更加轻量级。

    Painless中变量可以声明为基本数据类型、引用类型、字符串、void(不返回值)、数组以及动态类型。其支持下面基本类型:

    byte, short, char, int, long, float, double, boolean.声明变量与java类似:

    int i = 0; double a; boolean g = true;

    数组类型支持一维和多维,初始值为null。与引用类型一样,使用new关键字,并为每个维度设置中括号

    int[] x = new int[2];  
    x[0] = 3;  
    x[1] = 4;  
    
    int[] b = new int[] {1,2,3,4,5};  

    painless支持动态类型,elasticsearch会自动推断类型

    def a = 1;  
    def b = "foo";  
    def[][] h = new def[2][2];  

    条件语句和运算符

    Painless包含完整的操作符列表,除了它们的优先级和结合性之外,这些操作符与其他高级语言几乎兼容。

    if (doc['foo'].value = 5) {  
        doc['foo'].value *= 10;
    } 
    else {  
        doc['foo'].value += 10;
    }

    Painless支持if else,但不支持else ifswitch

    循环

    def total = 0;  
    for (def i = 0; i < doc['scores'].length; i++) {  
        total += doc['scores'][i];
    }
    return total;  

    5、控制相关度实践

    该实例中将使用script_score,将评分设置为:
    doc['download_cnt'].value * 2.5 +doc['replication_cnt'].value * 1.2

    {
        "query": {
            "function_score": {
                "query": {
                    "match": {
                        "name": "1"
                    }
                },
                "functions": [
                    {
                        "script_score": {
                            "script": {
                                "params": {
                                    "download_ratio": 2.5,
                                    "replication_ratio": 1.2
                                },
                                "lang": "painless",
                                "inline": "doc['download_cnt'].value * params.download_ratio + doc['replication_cnt'].value * params.replication_ratio"
                            }
                        }
                    }
                ]
            }
        }
    }

    _search操作中所有的返回值,都可以通过一个map类型变量doc获取。和所有其他脚本语言一样,用[]获取map中的值。这里要强调的是,doc只可以在_search中访问到